2021年1月31日 星期日

[SpringBoot 1.5] 錯誤處理 @ControllerAdvice, @ExceptionHandler, @ReponseStatus

 SpringBoot有預設的錯誤頁面處理

要實現這個我們首先可以在resource>templates>error的資料夾下

加入兩個頁面500.html , 404.html

並在resource>templates下面放index.html

然後造一個controller

@Controller
public class IndexController {

@GetMapping("/")
public String index(){
int i = 9/0;
return "index";
}
}

由於9/0會報錯

畫面就會自動導到命名為500的頁面

將報錯的那一行註解掉

我們在Build中點Recompile

然後刷新頁面

畫面就會來到首頁了

而當我們的URL打一個沒有資源的

ex http://127.0.0.1:8081/123456

他就會導到404的頁面

------------------------------------------------

而~如果我們要使用錯誤頁面, 並用其來顯示錯誤訊息, 可以以下搭配

1 先在error資料夾下產生一個error.xml檔案如下

<!DOCTYPE html>
<html lang="en" xmlns:th="http://www.w3.org/1999/xhtml">
<html lang="en">
<head>
<meta charset="UTF-8">
<title>錯誤</title>
</head>
<body>
<h1>錯誤</h1>

<div>
<div th:utext="'&lt;!--'" th:remove="tag"></div>
<div th:utext="'Failed Request URL : ' + ${url}" th:remove="tag"></div>
<div th:utext="'Exception message : ' + ${exception.message}" th:remove="tag"></div>
<ul th:remove="tag">
<li th:each="st : ${exception.stackTrace}" th:remove="tag"><span th:utext="${st}" th:remove="tag"></span></li>
</ul>
<div th:utext="'--&gt;'" th:remove="tag"></div>
</div>

</body>
</html>

2產生一個掛@ControllerAdvice的類別

他主要用法是一個搭配ExceptionHandler攔截Exception的一個功能

下列程式碼, 基本上攔截後, 如果他有掛ResponseStatus類別的話, 他會繼續throw e

而如果沒有掛ResponseStatus就會回傳一個ModelAndView物件並導到error頁面

@ControllerAdvice
public class ControllerExceptionHandler {

private final Logger logger = LoggerFactory.getLogger(this.getClass());
@ExceptionHandler(Exception.class)
public ModelAndView exceptionHandler(HttpServletRequest request, Exception e) throws Exception {
logger.error("Request URL : {}, Exception : {}",request.getRequestURL(),e);

if(AnnotationUtils.findAnnotation(e.getClass(), ResponseStatus.class)!=null){
throw e;
}

ModelAndView mv= new ModelAndView();
mv.addObject("url",request.getRequestURL());
mv.addObject("exception",e);
mv.setViewName("error/error");
return mv;
}
}


而, 如果我們想要做出對應404的Exception

1 產生一個個性化的Exception類別並掛上ResponseStatus

@ResponseStatus(HttpStatus.NOT_FOUND)
public class NotFoundException extends RuntimeException{
public NotFoundException() {
}

public NotFoundException(String message) {
super(message);
}

public NotFoundException(String message, Throwable cause) {
super(message, cause);
}
}


2在indexController中加入以下這段

String blog=null;
if(blog==null){
throw new NotFoundException("博客不存在");
}

因為剛剛已經在ControllerExceptionHandler中設置要繼續拋出e了

他就會跳轉到404的頁面


2021年1月30日 星期六

MySQL安裝問題

 一開始在安裝的時候, 如果一直點下一步的話

可能會遇到沒有安裝server的問題

事實上比較主要的部份包括介面, 還有server


所以, 如果裝完之後, 發現少了什麼, 要回來installer檢查一下

2021年1月26日 星期二

20210126月會 工作啟發

因為我們每兩周都有(同仁)分享報告

而主管也有要求我們要回饋分享的報告內容

主管也會統計這些回饋分配

由這樣的回饋我觀察有以下幫助

1 訓練對於簡報的報告品質(因為在回饋的同時也會注意到自己對報告的要求)

2 因為有一次一次的回饋, 同仁可以透過別人的回饋而改善下一次的報告品質

3 幫助同仁有互相幫助和欣賞的機會

4 由於差不多一兩個月就需要分享一次, 需要平時就累積工作上的職能(個人職能提升)

5 對於在場的聽者, 可以聽到不同與職能相關項目, 有助於開拓視野


2021年1月22日 星期五

寫完20篇心情和前輩交流紀錄

從12月至今, 已經完成了20篇文章,
這段時間, 考了兩次多益, 結果同分, 閱讀還略退步了點,
托福講師說, 還是從閱讀中來學單字, 會比單獨背單字會有效一點
這些也是題外話, 這是寫到一半, 大約斷了兩周的原因, 
然後~之後因為會準備考托福的緣故, 幾乎整周的時間表都確定
4天補英文, 3天+1天(不固定)會舉行英文讀書會, 在民權的路易莎

這段期間小有收穫, 幾次下來讀書會總成員已經有5位, 1女4男
有特別挑過是真心想讀書(把愛拉賽的都挑掉), 都可以坐上兩個小時,
能一起讀書, 的確比之前自己拚的感覺好, 一個人的進修是真的很煎熬,
特別取了名字Elite Programmer Taipei, 這是我對於自己的期許, 
我希望自己能成為Programmer中的菁英

來記錄一下想寫網誌的心情,
原本一開始, 是因為在工作上覺得有些東西, 受了前輩很大的幫助,
如果紀錄下來, 我覺得這些對於我在工作上會很好,
後來有一天, 我看到保哥的網誌, 我注意到了他年月出的文章,
剛開始的兩年, 幾乎每個月能出32篇文章,
他是.net領域的神級人物, 如果說, 這是他的變強途徑,
那麼我能不能複製呢?
想到這裡, 我就開始複製同樣的想法, 我也要每個月寫個30篇

關於內容上, 目前是以看Utube教學, 邊做, 邊寫筆記,
這一部分還是比較屬於開專案所要使用到的基本技能,
重點來了~~~~
---------------------------------------------------------------------------
今天讀書會的前輩跟我講說
其實這些spring的各項目IOC,AOP, JPA, SpringCloud
都是一個一個主題, 
一開始可以粗略地去懂怎麼使用就好,
但是更進階的, 可以去了解它的原碼,
懂得其運作的緣由, 進一步就可以對其設定進行操作,
有些JVM的調教, 提升效率的方式, 還是要對其原碼懂得操作,
才能夠設計得到位,
除此之外, 可以在每個新版本推出來的項目上,
比較其和舊版本中改善的項目, 或是新出現的項目,
那可能解決的問題, 就是目前該領域中最Hot最前衛的技術
研究其技術, 就自然會在該領域中作為技術的領導角色

聽完這些話真是價值連城阿,
一直在想, 為什麼公司裡屌不拉基的前輩為什麼可以這麼厲害,
在讀書會中, 聽到讀書會的前輩分享這些他關注的事情,
讓我體會出, 到底要如何才能更往高的階段去
---------------------------------------------------------------------------
目前一切都覺得進行不錯,
有穩定的英文和程式時間, 
擁有英文讀書會和程式讀書會各一, 都為主招集人,
幾乎每天寫技術文章, 有時一天還出兩篇
運動時間兩天, 相親時間一晚 也慢慢排入,
而最後大概就一天晚上玩遊戲,
我想, 成為大神的路慢慢的, 不會是夢想
現在比較主要的, 累積一些後, 跳到更厲害的地方去,
這樣就能跟更厲害的人切磋學習,

透過觀察大神所走過的路徑, 我相信我能更快的完成夢想


[SpringBoot 1.5] SpringBoot 新增範例

我們說到新增功能

他應該要包含兩個步驟

1 點進去進入到一個可以填寫空白資訊的頁面(employee>Get)

2 輸入完新增的資訊然後按下儲存鍵, 完成新增項目的儲存(employee>Post)

從畫面過來, 一開始是點擊這個標籤

<a href="emp" th:href="@{/emp}" class="btn btn-sm btn-success">員工添加</a>

然後會進到controller, 因為裡面會要將所有可以選取的Department顯示出來,

所以要先getDepartments再放到model中

@GetMapping("/emp")
public String toAddPage(Model model){
// 來到添加頁面, 查出所有的部門, 在頁面顯示
Collection<Department> departments = departmentDao.getDepartments();
model.addAttribute("depts",departments);
return "emp/add";
}

這裡的Department類別

public class Department {

private Integer id;
private String departmentName;
}

這是Dao

@Repository
public class DepartmentDao {

private static Map<Integer, Department> departments = null;

static{
departments = new HashMap<Integer, Department>();

departments.put(101, new Department(101, "D-AA"));
departments.put(102, new Department(102, "D-BB"));
departments.put(103, new Department(103, "D-CC"));
departments.put(104, new Department(104, "D-DD"));
departments.put(105, new Department(105, "D-EE"));
}

public Collection<Department> getDepartments(){
return departments.values();
}

public Department getDepartment(Integer id){
return departments.get(id);
}

}

然後畫面上的form是這樣

<form th:action="@{/emp}" method="post">

<input type="hidden" name="_method" value="put" th:if="${emp != null}">
<
input type="hidden" name="id" th:value="${emp != null} ? ${emp.id}">
<
div class="form-group">
<
label>LastName</label>
<
input name="lastName" type="text" class="form-control" placeholder="zhangsan" th:value="${emp != null} ? ${emp.lastName}">
</
div>
<
div class="form-group">
<
label>Email</label>
<
input name="email" type="email" class="form-control" placeholder="zhangsan@atguigu.com" th:value="${emp != null} ? ${emp.email}">
</
div>
<
div class="form-group">
<
label>Gender</label><br/>
<
div class="form-check form-check-inline">
<
input class="form-check-input" type="radio" name="gender" value="1" th:checked="${emp != null} ? ${emp.gender == 1}">
<
label class="form-check-label"></label>
</
div>
<
div class="form-check form-check-inline">
<
input class="form-check-input" type="radio" name="gender" value="0" th:checked="${emp != null} ? ${emp.gender == 0}">
<
label class="form-check-label"></label>
</
div>
</
div>
<
div class="form-group">
<
label>department</label>
<
select class="form-control" name="department.id">
<option th:value="${dept.id}" th:each="dept : ${depts}" th:text="${dept.departmentName}" th:selected="${emp != null} ? ${dept.id == emp.department.id}"></option>
</
select>
</
div>
<
div class="form-group">
<
label>Birth</label>
<
input name="birth" type="text" class="form-control" placeholder="zhangsan" th:value="${emp != null} ? ${#dates.format(emp.birth, 'yyyy-MM-dd HH:mm:ss')}">
</
div>
<
button type="submit" class="btn btn-primary" th:text="${emp != null} ? '修改' : '添加'"></button>
</
form>

其中我們可以看到拿出depts塞到dept中, 他會需要將id塞到value中, 要特別注意一下


那麼他送出, 就是一個Employee的model

這樣畫面上是使用name來做對應屬性

而department則要用department.id來對應

這個form發出的是Post請求

@PostMapping("/emp")
public String addEmp(Employee employee){
System.out.println("保存的員工信息: "+employee);
employeeDao.save(employee);
return "redirect:/emps";
}

但是記得進入的時候要重新導向redirect

而以下是dao的 save功能

private static Integer initId = 1006;
public void save(Employee employee){
if(employee.getId() == null){
employee.setId(initId++);
}

employee.setDepartment(departmentDao.getDepartment(employee.getDepartment().getId()));
employees.put(employee.getId(), employee);
}

還有一個日期要做補充

通常預設日期會為20xx/xx/xx 

如果要格式化日期, 是可以在application.properties中做控制的, 如以下

spring.mvc.date-format=yyyy-mm-dd


[SpringBoot 1.5] SpringBoot 查詢範例

當我們要將員工資訊顯示出來

這就是一個查詢功能


我們的model為一個Employee類別 屬性如下

public class Employee {

private Integer id;
private String lastName;

private String email;
//1 male, 0 female
private Integer gender;
private Department department;
private Date birth;

然後我們設置一個controller中的方法

@Repository
public class EmployeeDao {
@GetMapping("/emps")
public String list(Model model){
Collection<Employee> employees = employeeDao.getAll();

model.addAttribute("emps",employees);
return "emp/list";
}

我們使用model.addAttribute來設置model中內容

當他點選到該連結, 就可以導向過來controller再return給list頁面

<a class="nav-link active"
th:class="${activeUri=='emps.html'?'nav-link active':'nav-link'}"
href="#" th:href="@{/emps}">

其中搭配著employeeDao為

@Repository
public class EmployeeDao {
private static Map<Integer, Employee> employees = null;

@Autowired
private DepartmentDao departmentDao;

static{
employees = new HashMap<Integer, Employee>();

employees.put(1001, new Employee(1001, "E-AA", "aa@163.com", 1, new Department(101, "D-AA")));
employees.put(1002, new Employee(1002, "E-BB", "bb@163.com", 1, new Department(102, "D-BB")));
employees.put(1003, new Employee(1003, "E-CC", "cc@163.com", 0, new Department(103, "D-CC")));
employees.put(1004, new Employee(1004, "E-DD", "dd@163.com", 0, new Department(104, "D-DD")));
employees.put(1005, new Employee(1005, "E-EE", "ee@163.com", 1, new Department(105, "D-EE")));
}

private static Integer initId = 1006;


public Collection<Employee> getAll(){
return employees.values();
}
}

而前端的頁面為

<tr th:each="emp:${emps}">
<td th:text="${emp.id}"></td>
<td>[[${emp.lastName}]]</td>
<td th:text="${emp.email}"></td>
<td th:text="${emp.gender} == 0 ? '' : ''"></td>
<td th:text="${emp.department.departmentName}"></td>
<td th:text="${#dates.format(emp.birth, 'yyyy-MM-dd HH:mm:ss')}"></td>
<td>
<!--<a th:href="@{/emp/} + ${emp.id}" class="btn btn-sm btn-primary">编辑</a>-->
<a th:href="@{/emp/} + ${emp.id}" class="btn btn-sm btn-primary">编辑</a>
<button th:attr="del_uri = @{/emp/} + ${emp.id}" type="submit" class="btn btn-sm btn-danger deleteBtn">删除</button>
</td>
</tr>

為一個使用th:each來遍歷model中emps的每一筆資料, 時間格是可以用dates.format

查出每筆資料有兩種寫法, 一種為th:text="${model.attribute}"

另外一種為[[${model.attribute}]]


[SpringBoot 1.5] Thymeleaf 判斷顯示根據參數


我們在左邊的目錄, 在情境下會想要當點選的時候, 要改變不同的顏色

可以用以下的判斷來顯示

在list.html中使用以下

<div th:replace="commons/bar::#sidebar(activeUri='emps.html')"></div>

用以告訴對方目前頁面是emps.html

而dashboard.html中使用以下

<div th:replace="commons/bar::#sidebar(activeUri='main.html')"></div>

用以告訴對方目前頁面是main.html

而在被鑲嵌的目錄就可以設置以下

<a class="nav-link active"
th:class="${activeUri=='main.html'?'nav-link active':'nav-link'}"
href="#" th:href="@{main.html}">

這個就是判斷如果現在點選該頁面的話, 目前的activeUri被設置為main.html就會判斷出來

然後因此nav-link的css值就會有active

同理, 如果是Customers被選到的時候要讓他有顯示

就用以下這段就行了

<a class="nav-link active"
th:class="${activeUri=='emps.html'?'nav-link active':'nav-link'}"
href="#" th:href="@{/emps}">


2021年1月20日 星期三

[SpringBoot 1.5] thymeleaf template layout介紹

1 抽取公共片段

在會重複使用的code中加入th:fragment="copy"

如以下

<div th:fragment="copy">

OOXXX

</div>


2引入公共片段

然後在要重複的code中插入

<div th:insert="~{footer :: copy}"></div>

這邊也可以寫作

<div th:insert="footer :: copy"></div>

這樣就可以共用程式碼簡化重複的code了

而 ~{footer :: copy}為

 ~{templatename:: selector} 模板名::選擇器

 ~{templatename:: fragmentname} 模板名::片段名

------------------------------------------------------------

三種引用方式

th:insert >將公共片段整段插入到聲明引用的元素中

th:replace >將聲明引入的元素替換為公共片段

th:include >將引入的片段的內容包含進這個標籤中


範例

<footer th:fragment="copy">

    &copy; 2021 The Good Thymes Vitrual Grocery

</footer>


引入方式

<body>

    <div th:insert="footer :: copy"></div>

    <div th:replace="footer :: copy"></div>

    <div th:include="footer :: copy"></div>

</body>


效果

<body>

    <div>

           <footer>

                       &copy; 2021 The Good Thymes Vitrual Grocery

           </footer>

    </div>

            <footer>

                       &copy; 2021 The Good Thymes Vitrual Grocery

           </footer>

            <div>

                       &copy; 2021 The Good Thymes Vitrual Grocery

           </div>

</body>


------------------------------

另外一種設定方式, 可以依照id( ~{templatename:: selector} )

<div id="copy-section">

        &copy; 2021 The Good Thymes Vitrual Grocery

</div>


<div th:insert="~{footer : : #copy-section}"></div>

2021年1月19日 星期二

Compax Closing Status Report 紀錄

Compax AAX Technical Service

期間2019/06-2020/12

AAX/TMF developments/tests

------

專案結案會議報告是要納管的

1客戶介紹包含組織成員

2成員角色負責項目開發內容介紹(所有成果要歸功於在座各位)

3專案成果(全部門績效第一) 表達對貢獻的感謝

4專案品質檢驗

5檢討回饋

------------------------------------------------------------------

Ian 

point: 177 

defect:12

percentage:6.78%

改善方向: 

1 typo , 測試資料未刪 

2 Null 

3 Exception

建議: 

*寫完程式自行進行校正

*UT應善用null值進行測試

*判斷情境是否Exception正確

-------------------------------------------------------------

普遍code review suggestion 

1Exception處理 

2Null處理 

3可讀性

-------------------------------------------------------------

*這個案子你學到什麼? 這個部分還有哪些需要調整?

Jena: 帶新人進入會有壓力, Peter進步很快, Leon開朗, 努力

要接受比較嚴厲的建議


Peter: 寫程式很久之前, 有點怕, 感謝Jena, 接受建議並應用, 了解Java開發專案如何進行

(以前都是做測試), 很感謝這邊所有人都給我幫助, 感謝Solomen給我心理輔導


佳蓮: 我第一次完整專案, 一開始只會select後來會join, 比較幸運有上公司課程, 

大家執行TMF專案, 要先討論再來做會比較好


Jackson: TMF國外案子和技術都是蠻有挑戰性, 對人的問題, 大家可以共同努力,

對人照著想做的方式前進, 交給管理層的問題, 對專案成果的紀律問題


Leon: 這是我轉職成功第一個工作, 技術方面學到蠻多東西, java8 和git技巧, 

做事優先順序, 事情大方向, 感謝Jackson指導, 我覺得coding guideline是很好的,

是可以看得到的規範


Lily: 早點統計, 早點留意, 錯誤的類型, 跟大家彼此互相切磋蠻好的


Peter: 人生中比較認真寫程式的, 這個團隊非常好, 來這邊是接受大家的精華, 

感謝Sherry課表讓新人可以快速進入狀況, 要加強就是寫code


Jasmine: 我今年在公司20年, 轉到這個team掙扎, 不知道自己發展會怎麼樣,

我都在這領域待19年, 我想要的是學新的東西, 到不同的世界去看看別的世界做什麼,

自己還需要學什麼, 需要怎麼改善, 在前15個月我都在做國際化的事, 也有機會嘗試到

什麼是test, 這樣聽下來, 都知道大家想要很快進入狀況, 大家都是對自己很有要求,

這是我對這個team覺得不錯的地方, Jena, Solomon都幫助我很多, 我跟大家都學到很多東西


Solomon: 一路上都是Sherry提拔我, 每場面試我都很辛苦, 你的表情你的語氣, 我們都要

觀察這個人適不適合在這專案上, 你自己要考慮要跟這個人要怎麼跟他相處, 一路走來

受到很多人幫忙, 每個人都花最大努力在這專案上, 我相信我們找進來的人都是非常優秀,

這是我們很驕傲的地方, 我們當初選人選對人, 這也是我第一個專案, 我以前都是做測試,

Sherry在各方面帶我很多, 怎麼跟客戶接觸, 怎麼promote自己, 因為我是在做中學, 謝謝

大家的配合, 使這個案子可以得到客戶的賞識, 希望自己學到的可以應用到之後專案上,

->>>專案當中你覺得這個專案比較好, 我們日後可以延續或更好?

Scadule定下去大家都follow是好的, 管理工具上可以改進ex進度表(我早上開會前要去問)


Sherry: 這個案子是第一個自動找上門來的, 這個不是原來班底, 從無到有, 最難的是decipline

每個人有不同的開發習慣, 做事習慣, 每個人要認同公司文化, 對管理上來說挑戰極高,

他只能成功不能失敗, 這案子是被關注的焦點, 我和Solomon是壓力極大, 我們在其中是

需要做包容, 如何做Implove, 我要謝謝Jasmine, Jena, 小立, 第一批進來, 需要引導同仁進入

公司的文化, 如何從frelancer轉為員工, 我們團隊中也擁有很多特別人格特質, 謝謝Jena在

幫我帶人上的幫助, 之前的TMF只能有一個規則, 有來有去都有階段性任務, 也是感謝在

草創期建立起來的名聲, 當初我們設的主軸是分享, 合作, 彼此幫忙幫助對方帶到一個水平,

在這裡面Solomon是被我責難最多的, 在這中我們是很努力在讓團隊一起進步, 每個人都有

優點和不足的部分, 希望我們的包容度更大, 我們要要求自己, 只有自己更好, 團隊才會成功

這裡老闆也是看到數字, 你們可以看看績效, 你們可以去看得到, 這個案子大家也辛苦了


Solomon: 重複的要求, 如果當下做到就好, 就可以多點時間拿去開發, 而不是花在開會時間上

Sherry: 寫文件的練習重要 


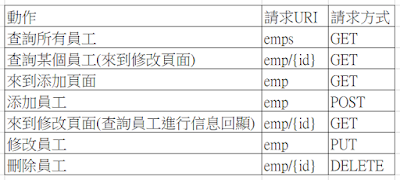
RestfulCRUD 簡單介紹

1 比較普通的CRUD和RestfulCRUD

RestfulCRUD樣貌如下

URI:/資源名稱/資源標示 

依照HTTP請求方式區分對資源CRUD操作

比較表如下


RestfulCRUD明顯的方式是對於"資源", 做某項"動作"

2 課程使用的樣式


[SpringBoot 1.5] 登入及攔截器HandlerInterceptor

一般在Controller中我們會使用以下語法

@RequestMapping(value = "/user/login", method = RequestMethod.POST)

但是在較新版中已經簡化成以下

@PostMapping(value = "/user/login")

因為PostMapping已經有將 method = RequestMethod.POST 寫好

controller的程式碼如下

@PostMapping(value = "/user/login")
public String login(@RequestParam("username") String username,
@RequestParam("password") String password,
Map<String,Object> map){
if(!StringUtils.isEmpty(username)&&"123456".equals(password)){
//登入成功
return "dashboard";
}else{
//登入失敗
map.put("msg","用戶名密碼錯誤");
return "login";
}
}

前端的程式碼

<label class="sr-only" th:text="#{login.username}">Username</label>
<input type="text" name="username" class="form-control" placeholder="Username"
th:placeholder="#{login.username}" required="" autofocus="">
<label class="sr-only" th:text="#{login.password}">Password</label>
<input type="password" name="password" class="form-control" placeholder="Password"
th:placeholder="#{login.password}" required="">

這裡的對應是由name來做@RequestParam的對應

那這邊特別紀錄一下, 因為thymeleaf有緩存的設置

所以這邊要在properties檔案中加入這段

spring.thymeleaf.cache=false

以後在修改靜態頁面只要ctrl+f9 刷一下瀏覽器就可以看效果了

而錯誤訊息可以用以下這段在頁面顯示

<p style="color: red;" th:text="${msg}" th:if="${not #strings.isEmpty(msg)}"></p>

----------------------------------------

製作攔截器

1 在controller加入Session檢核, 只要成功登入, 就將username塞到Session中

@PostMapping(value = "/login")
public String login(@RequestParam("username") String username,
@RequestParam("password") String password,
Map<String,Object> map, HttpSession session){
if(!StringUtils.isEmpty(username)&&"123456".equals(password)){
//登入成功
session.setAttribute("loginUser",username);
return "redirect:/main.html";
}else{
//登入失敗
map.put("msg","用戶名密碼錯誤");
return "login";
}
}

2 在component包中製作一個LoginHandlerInterceptor 類別去繼承HandlerInterceptor 

類別, 並複寫三個父類方法

public class LoginHandlerInterceptor implements HandlerInterceptor {
@Override
public boolean preHandle(HttpServletRequest request, HttpServletResponse response, Object handler) throws Exception {
return false;
}
@Override
public void postHandle(HttpServletRequest request, HttpServletResponse response, Object handler, ModelAndView modelAndView) throws Exception {
}
@Override
public void afterCompletion(HttpServletRequest request, HttpServletResponse response, Object handler, Exception ex) throws Exception {
}
}

3 在preHandle中加入以下這段程式碼當作檢核, 如果沒有權限的話, 

會有錯誤訊息, 並且導頁到首頁

public boolean preHandle(HttpServletRequest request, HttpServletResponse response, Object handler) throws Exception {
Object user=request.getSession().getAttribute("loginUser");
if(user==null){
request.setAttribute("msg","沒有權限請先登入");
request.getRequestDispatcher("/index.html").forward(request,response);
return false;
}else{
return true;
}
}

4在自設定的configuration檔案中的@Bean, 增加addInterceptors的方法

加入攔截器並排除不需要攔截的頁面

@Bean
public WebMvcConfigurerAdapter webMvcConfigurerAdapter(){
WebMvcConfigurerAdapter adapter= new WebMvcConfigurerAdapter(){
@Override
public void addViewControllers(ViewControllerRegistry registry) {
registry.addViewController("/").setViewName("login");
registry.addViewController("/index.html").setViewName("login");
registry.addViewController("/main.html").setViewName("dashboard");
}

@Override
public void addInterceptors(InterceptorRegistry registry) {
registry.addInterceptor(new LoginHandlerInterceptor()).addPathPatterns("/**")
.excludePathPatterns("/index.html","/","/login");
}
};

return adapter;
}

5從Session中取出使用者資訊, 放在畫面上

<a class="navbar-brand col-sm-3 col-md-2 mr-0" href="#">[[${session.loginUser}]]</a>


這樣就完成了, 每當用戶進入到下個頁面就會被攔截器去檢核


2021年1月18日 星期一

[SpringBoot 1.5] 國際化

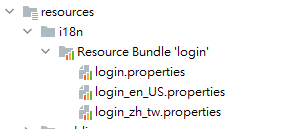
1 在resources下面建一個資料夾i18n並產生properties檔案


2 在檔案左下方切換到ResourceBundle視圖模式, 並點左上方加號來新增屬性

並在屬性的右邊將屬性在各國語言下的值輸入進去


3 使用thymeleaf語法如下

th:text="#{login.tip}

完整的程式碼如下

<!DOCTYPE html>
<html lang="en" xmlns:th="http://www.thymeleaf.org">
<head>
<meta http-equiv="Content-Type" content="text/html; charset=UTF-8">
<meta name="viewport" content="width=device-width, initial-scale=1, shrink-to-fit=no">
<meta name="description" content="">
<meta name="author" content="">
<title>Signin Template for Bootstrap</title>
<!-- Bootstrap core CSS -->
<!--链接(URL@{…} /crud/asserts/css/bootstrap.min.css-->
<link th:href="@{/asserts/css/bootstrap.min.css}" href="asserts/css/bootstrap.min.css" rel="stylesheet">
<!-- Custom styles for this template -->
<link th:href="@{/asserts/css/signin.css}" href="asserts/css/signin.css" rel="stylesheet">
</head>
<body class="text-center">
<form class="form-signin" action="dashboard.html" th:action="@{/user/login}" method="post">
<img class="mb-4" src="asserts/img/bootstrap-solid.svg" alt="" width="72" height="72">
<h1 class="h3 mb-3 font-weight-normal" th:text="#{login.tip}">Please sign in</h1>

<label class="sr-only" th:text="#{login.username}">Username</label>
<input type="text" name="username" class="form-control" placeholder="Username" th:placeholder="#{login.username}" required="" autofocus="">
<label class="sr-only" th:text="#{login.password}">Password</label>
<input type="password" name="password" class="form-control" placeholder="Password" th:placeholder="#{login.password}" required="">
<div class="checkbox mb-3">
<label>
<input type="checkbox" value="remember-me"> [[#{login.remember}]] <!--行内表达式-->
</label>
</div>
<button class="btn btn-lg btn-primary btn-block" type="submit" th:text="#{login.btn}">Sign in</button>
<p class="mt-5 mb-3 text-muted">© 2017-2018</p>
<a class="btn btn-sm" th:href="@{/index.html(l='zh_tw')}">[[#{login.chinese}]]</a>
<a class="btn btn-sm" th:href="@{/index.html(l='en_US')}">[[#{login.englist}]]</a>
</form>
</body>
</html>

這樣~瀏覽器就會依據你選擇最優先的語言來做顯示

----------------------------------------------

原碼分析

在我們的SpringBoot自動配置類別 WebMvcAutoConfiguration

我們可以找到以下程式碼

@Bean
@ConditionalOnMissingBean
@ConditionalOnProperty(prefix = "spring.mvc", name = "locale")
public LocaleResolver localeResolver() {
if (this.mvcProperties
.getLocaleResolver() == WebMvcProperties.LocaleResolver.FIXED) {
return new FixedLocaleResolver(this.mvcProperties.getLocale());
}
AcceptHeaderLocaleResolver localeResolver = new AcceptHeaderLocaleResolver();
localeResolver.setDefaultLocale(this.mvcProperties.getLocale());
return localeResolver;
}

這段的意思是, 如果我們有找到固定的LocalResolver配置, 我們就使用固定的

不然我們就會使用new AcceptHeaderLocaleResolver()

其中有一個方法

@Override
public Locale resolveLocale(HttpServletRequest request) {
Locale defaultLocale = getDefaultLocale();
if (defaultLocale != null && request.getHeader("Accept-Language") == null) {
return defaultLocale;
}
Locale requestLocale = request.getLocale();
if (isSupportedLocale(requestLocale)) {
return requestLocale;
}
Locale supportedLocale = findSupportedLocale(request);
if (supportedLocale != null) {
return supportedLocale;
}
return (defaultLocale != null ? defaultLocale : requestLocale);
}

他會從request中或取得locale訊息


----------------------------------------------------

客製化locale

現在要做一個能夠依照選擇來定語言的方式可以這樣做

造一個component.MylLocaleResolver去繼承LocaleResolver類別

繼承方法, 並如下寫

這個想法是, 他要接request的傳參數, 根據參數來做判斷

如果參數有值, 就拿參數值拆去產生locale物件來使用


public class MyLocaleResolver implements LocaleResolver{
@Override
public Locale resolveLocale(HttpServletRequest request) {
String l=request.getParameter("l");
Locale locale=Locale.getDefault();
if(!StringUtils.isEmpty(l)){
String[] split =l.split("_");
locale=new Locale(split[0],split[1]);
}
return locale;
}

@Override
public void setLocale(HttpServletRequest request, HttpServletResponse response, Locale locale) {

}
}


而畫面上的配合要寫成這樣 th:href="@{/index.html(l='zh_tw')}"

如下

<a class="btn btn-sm" th:href="@{/index.html(l='zh_tw')}">[[#{login.chinese}]]</a>
<a class="btn btn-sm" th:href="@{/index.html(l='en_US')}">[[#{login.englist}]]</a>


然後~有一點還要做的就是, 要在自定義的config檔案中載入Bean讓他可以使用


//使用WebMvcConfigurerAdapter 可以來擴展SpringMVC的功能
@Configuration
public class MyMvcConfig extends WebMvcConfigurerAdapter {
//control+O 可以找到父類所有可用方法

@Override
public void addViewControllers(ViewControllerRegistry registry) {
//super.addViewControllers(registry);
//瀏覽器發送/atguigu請求來到success
registry.addViewController("/atguigu").setViewName("success");
}

@Bean
public WebMvcConfigurerAdapter webMvcConfigurerAdapter(){
WebMvcConfigurerAdapter adapter= new WebMvcConfigurerAdapter(){
@Override
public void addViewControllers(ViewControllerRegistry registry) {
registry.addViewController("/").setViewName("login");
registry.addViewController("/index.html").setViewName("login");
}
};
return adapter;
}

@Bean
public LocaleResolver localeResolver(){
return new MyLocaleResolver();
}

}

第二個Bean的是做導頁, 也就是如果是"/"他會導到login, /index.html他也會導到login


[SpringBoot 1.5] 使用 thymeleaf

 在pom.xml檔案 這一段加入properites中

<thymeleaf.version>3.0.9.RELEASE</thymeleaf.version>
<!--布局功能的支持程序 thymeleaf3 主程序 layout2以上版本-->
<!--thymeleaf2 layout1 适配-->
<thymeleaf-layout-dialect.version>2.3.0</thymeleaf-layout-dialect.version>

然後 dependencies中加入這段

<dependency>
<groupId>org.springframework.boot</groupId>
<artifactId>spring-boot-starter-thymeleaf</artifactId>
</dependency>


因為thymeleaf 在SpringBoot的autoconfigure包中已經有配置好


package org.springframework.boot.autoconfigure.thymeleaf;

import java.nio.charset.Charset;

import org.springframework.boot.context.properties.ConfigurationProperties;
import org.springframework.util.MimeType;
@ConfigurationProperties(prefix = "spring.thymeleaf")
public class ThymeleafProperties {

private static final Charset DEFAULT_ENCODING = Charset.forName("UTF-8");

private static final MimeType DEFAULT_CONTENT_TYPE = MimeType.valueOf("text/html");

public static final String DEFAULT_PREFIX = "classpath:/templates/";

public static final String DEFAULT_SUFFIX = ".html";


因此以上項目, 如果頁面有放在templates資料夾下面, 他就能使用已經配置好的tymeleaf功能

另外一部分還要在頁面的頭部加入以下內容


<html lang="en" xmlns:th="http://www.thymeleaf.org">

以下我們示範一個簡單的範例


畫面:

<!DOCTYPE html>
<html lang="en" xmlns:th="http://www.thymeleaf.org">
<head>
<meta charset="UTF-8">
<title>Title</title>
</head>
<body>
<h1>成功</h1>

<div th:text="${hello}">這是顯示歡迎訊息</div>
</body>
</html>

------------------------------------------------------------------------

java code:

@Controller

public class HelloController {

@RequestMapping("/success")
public String success(Map<String,Object> map){
map.put("hello","您好");
return "success";
}
}


海科面試問題

 1 關於 java中的spring 有ioc和aop可以介紹一下分別是在做什麼嗎? 在Java的Spring框架中,IoC(控制反轉)和AOP(面向切面編程)是兩個非常重要的概念。 1. IoC(控制反轉) IoC是一種設計模式,主要用於改進代碼的可維護性和可測試性。在IoC中...