2021年1月19日 星期二

[SpringBoot 1.5] 登入及攔截器HandlerInterceptor

一般在Controller中我們會使用以下語法

@RequestMapping(value = "/user/login", method = RequestMethod.POST)

但是在較新版中已經簡化成以下

@PostMapping(value = "/user/login")

因為PostMapping已經有將 method = RequestMethod.POST 寫好

controller的程式碼如下

@PostMapping(value = "/user/login")
public String login(@RequestParam("username") String username,
@RequestParam("password") String password,
Map<String,Object> map){
if(!StringUtils.isEmpty(username)&&"123456".equals(password)){
//登入成功
return "dashboard";
}else{
//登入失敗
map.put("msg","用戶名密碼錯誤");
return "login";
}
}

前端的程式碼

<label class="sr-only" th:text="#{login.username}">Username</label>
<input type="text" name="username" class="form-control" placeholder="Username"
th:placeholder="#{login.username}" required="" autofocus="">
<label class="sr-only" th:text="#{login.password}">Password</label>
<input type="password" name="password" class="form-control" placeholder="Password"
th:placeholder="#{login.password}" required="">

這裡的對應是由name來做@RequestParam的對應

那這邊特別紀錄一下, 因為thymeleaf有緩存的設置

所以這邊要在properties檔案中加入這段

spring.thymeleaf.cache=false

以後在修改靜態頁面只要ctrl+f9 刷一下瀏覽器就可以看效果了

而錯誤訊息可以用以下這段在頁面顯示

<p style="color: red;" th:text="${msg}" th:if="${not #strings.isEmpty(msg)}"></p>

----------------------------------------

製作攔截器

1 在controller加入Session檢核, 只要成功登入, 就將username塞到Session中

@PostMapping(value = "/login")
public String login(@RequestParam("username") String username,
@RequestParam("password") String password,
Map<String,Object> map, HttpSession session){
if(!StringUtils.isEmpty(username)&&"123456".equals(password)){
//登入成功
session.setAttribute("loginUser",username);
return "redirect:/main.html";
}else{
//登入失敗
map.put("msg","用戶名密碼錯誤");
return "login";
}
}

2 在component包中製作一個LoginHandlerInterceptor 類別去繼承HandlerInterceptor 

類別, 並複寫三個父類方法

public class LoginHandlerInterceptor implements HandlerInterceptor {
@Override
public boolean preHandle(HttpServletRequest request, HttpServletResponse response, Object handler) throws Exception {
return false;
}
@Override
public void postHandle(HttpServletRequest request, HttpServletResponse response, Object handler, ModelAndView modelAndView) throws Exception {
}
@Override
public void afterCompletion(HttpServletRequest request, HttpServletResponse response, Object handler, Exception ex) throws Exception {
}
}

3 在preHandle中加入以下這段程式碼當作檢核, 如果沒有權限的話, 

會有錯誤訊息, 並且導頁到首頁

public boolean preHandle(HttpServletRequest request, HttpServletResponse response, Object handler) throws Exception {
Object user=request.getSession().getAttribute("loginUser");
if(user==null){
request.setAttribute("msg","沒有權限請先登入");
request.getRequestDispatcher("/index.html").forward(request,response);
return false;
}else{
return true;
}
}

4在自設定的configuration檔案中的@Bean, 增加addInterceptors的方法

加入攔截器並排除不需要攔截的頁面

@Bean
public WebMvcConfigurerAdapter webMvcConfigurerAdapter(){
WebMvcConfigurerAdapter adapter= new WebMvcConfigurerAdapter(){
@Override
public void addViewControllers(ViewControllerRegistry registry) {
registry.addViewController("/").setViewName("login");
registry.addViewController("/index.html").setViewName("login");
registry.addViewController("/main.html").setViewName("dashboard");
}

@Override
public void addInterceptors(InterceptorRegistry registry) {
registry.addInterceptor(new LoginHandlerInterceptor()).addPathPatterns("/**")
.excludePathPatterns("/index.html","/","/login");
}
};

return adapter;
}

5從Session中取出使用者資訊, 放在畫面上

<a class="navbar-brand col-sm-3 col-md-2 mr-0" href="#">[[${session.loginUser}]]</a>


這樣就完成了, 每當用戶進入到下個頁面就會被攔截器去檢核

2021年1月18日 星期一

[SpringBoot 1.5] 國際化

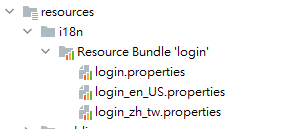
1 在resources下面建一個資料夾i18n並產生properties檔案


2 在檔案左下方切換到ResourceBundle視圖模式, 並點左上方加號來新增屬性

並在屬性的右邊將屬性在各國語言下的值輸入進去


3 使用thymeleaf語法如下

th:text="#{login.tip}

完整的程式碼如下

<!DOCTYPE html>
<html lang="en" xmlns:th="http://www.thymeleaf.org">
<head>
<meta http-equiv="Content-Type" content="text/html; charset=UTF-8">
<meta name="viewport" content="width=device-width, initial-scale=1, shrink-to-fit=no">
<meta name="description" content="">
<meta name="author" content="">
<title>Signin Template for Bootstrap</title>
<!-- Bootstrap core CSS -->
<!--链接(URL@{…} /crud/asserts/css/bootstrap.min.css-->
<link th:href="@{/asserts/css/bootstrap.min.css}" href="asserts/css/bootstrap.min.css" rel="stylesheet">
<!-- Custom styles for this template -->
<link th:href="@{/asserts/css/signin.css}" href="asserts/css/signin.css" rel="stylesheet">
</head>
<body class="text-center">
<form class="form-signin" action="dashboard.html" th:action="@{/user/login}" method="post">
<img class="mb-4" src="asserts/img/bootstrap-solid.svg" alt="" width="72" height="72">
<h1 class="h3 mb-3 font-weight-normal" th:text="#{login.tip}">Please sign in</h1>

<label class="sr-only" th:text="#{login.username}">Username</label>
<input type="text" name="username" class="form-control" placeholder="Username" th:placeholder="#{login.username}" required="" autofocus="">
<label class="sr-only" th:text="#{login.password}">Password</label>
<input type="password" name="password" class="form-control" placeholder="Password" th:placeholder="#{login.password}" required="">
<div class="checkbox mb-3">
<label>
<input type="checkbox" value="remember-me"> [[#{login.remember}]] <!--行内表达式-->
</label>
</div>
<button class="btn btn-lg btn-primary btn-block" type="submit" th:text="#{login.btn}">Sign in</button>
<p class="mt-5 mb-3 text-muted">© 2017-2018</p>
<a class="btn btn-sm" th:href="@{/index.html(l='zh_tw')}">[[#{login.chinese}]]</a>
<a class="btn btn-sm" th:href="@{/index.html(l='en_US')}">[[#{login.englist}]]</a>
</form>
</body>
</html>

這樣~瀏覽器就會依據你選擇最優先的語言來做顯示

----------------------------------------------

原碼分析

在我們的SpringBoot自動配置類別 WebMvcAutoConfiguration

我們可以找到以下程式碼

@Bean
@ConditionalOnMissingBean
@ConditionalOnProperty(prefix = "spring.mvc", name = "locale")
public LocaleResolver localeResolver() {
if (this.mvcProperties
.getLocaleResolver() == WebMvcProperties.LocaleResolver.FIXED) {
return new FixedLocaleResolver(this.mvcProperties.getLocale());
}
AcceptHeaderLocaleResolver localeResolver = new AcceptHeaderLocaleResolver();
localeResolver.setDefaultLocale(this.mvcProperties.getLocale());
return localeResolver;
}

這段的意思是, 如果我們有找到固定的LocalResolver配置, 我們就使用固定的

不然我們就會使用new AcceptHeaderLocaleResolver()

其中有一個方法

@Override
public Locale resolveLocale(HttpServletRequest request) {
Locale defaultLocale = getDefaultLocale();
if (defaultLocale != null && request.getHeader("Accept-Language") == null) {
return defaultLocale;
}
Locale requestLocale = request.getLocale();
if (isSupportedLocale(requestLocale)) {
return requestLocale;
}
Locale supportedLocale = findSupportedLocale(request);
if (supportedLocale != null) {
return supportedLocale;
}
return (defaultLocale != null ? defaultLocale : requestLocale);
}

他會從request中或取得locale訊息


----------------------------------------------------

客製化locale

現在要做一個能夠依照選擇來定語言的方式可以這樣做

造一個component.MylLocaleResolver去繼承LocaleResolver類別

繼承方法, 並如下寫

這個想法是, 他要接request的傳參數, 根據參數來做判斷

如果參數有值, 就拿參數值拆去產生locale物件來使用


public class MyLocaleResolver implements LocaleResolver{
@Override
public Locale resolveLocale(HttpServletRequest request) {
String l=request.getParameter("l");
Locale locale=Locale.getDefault();
if(!StringUtils.isEmpty(l)){
String[] split =l.split("_");
locale=new Locale(split[0],split[1]);
}
return locale;
}

@Override
public void setLocale(HttpServletRequest request, HttpServletResponse response, Locale locale) {

}
}


而畫面上的配合要寫成這樣 th:href="@{/index.html(l='zh_tw')}"

如下

<a class="btn btn-sm" th:href="@{/index.html(l='zh_tw')}">[[#{login.chinese}]]</a>
<a class="btn btn-sm" th:href="@{/index.html(l='en_US')}">[[#{login.englist}]]</a>


然後~有一點還要做的就是, 要在自定義的config檔案中載入Bean讓他可以使用


//使用WebMvcConfigurerAdapter 可以來擴展SpringMVC的功能
@Configuration
public class MyMvcConfig extends WebMvcConfigurerAdapter {
//control+O 可以找到父類所有可用方法

@Override
public void addViewControllers(ViewControllerRegistry registry) {
//super.addViewControllers(registry);
//瀏覽器發送/atguigu請求來到success
registry.addViewController("/atguigu").setViewName("success");
}

@Bean
public WebMvcConfigurerAdapter webMvcConfigurerAdapter(){
WebMvcConfigurerAdapter adapter= new WebMvcConfigurerAdapter(){
@Override
public void addViewControllers(ViewControllerRegistry registry) {
registry.addViewController("/").setViewName("login");
registry.addViewController("/index.html").setViewName("login");
}
};
return adapter;
}

@Bean
public LocaleResolver localeResolver(){
return new MyLocaleResolver();
}

}

第二個Bean的是做導頁, 也就是如果是"/"他會導到login, /index.html他也會導到login


[SpringBoot 1.5] 使用 thymeleaf

 在pom.xml檔案 這一段加入properites中

<thymeleaf.version>3.0.9.RELEASE</thymeleaf.version>
<!--布局功能的支持程序 thymeleaf3 主程序 layout2以上版本-->
<!--thymeleaf2 layout1 适配-->
<thymeleaf-layout-dialect.version>2.3.0</thymeleaf-layout-dialect.version>

然後 dependencies中加入這段

<dependency>
<groupId>org.springframework.boot</groupId>
<artifactId>spring-boot-starter-thymeleaf</artifactId>
</dependency>


因為thymeleaf 在SpringBoot的autoconfigure包中已經有配置好


package org.springframework.boot.autoconfigure.thymeleaf;

import java.nio.charset.Charset;

import org.springframework.boot.context.properties.ConfigurationProperties;
import org.springframework.util.MimeType;
@ConfigurationProperties(prefix = "spring.thymeleaf")
public class ThymeleafProperties {

private static final Charset DEFAULT_ENCODING = Charset.forName("UTF-8");

private static final MimeType DEFAULT_CONTENT_TYPE = MimeType.valueOf("text/html");

public static final String DEFAULT_PREFIX = "classpath:/templates/";

public static final String DEFAULT_SUFFIX = ".html";


因此以上項目, 如果頁面有放在templates資料夾下面, 他就能使用已經配置好的tymeleaf功能

另外一部分還要在頁面的頭部加入以下內容


<html lang="en" xmlns:th="http://www.thymeleaf.org">

以下我們示範一個簡單的範例


畫面:

<!DOCTYPE html>
<html lang="en" xmlns:th="http://www.thymeleaf.org">
<head>
<meta charset="UTF-8">
<title>Title</title>
</head>
<body>
<h1>成功</h1>

<div th:text="${hello}">這是顯示歡迎訊息</div>
</body>
</html>

------------------------------------------------------------------------

java code:

@Controller

public class HelloController {

@RequestMapping("/success")
public String success(Map<String,Object> map){
map.put("hello","您好");
return "success";
}
}


2021年1月14日 星期四

[SpringBoot 1.5] SpringMVC自動配置


以下是SpringBoot文件的網址

https://docs.spring.io/spring-boot/docs/1.5.12.RELEASE/reference/htmlsingle/#boot-features-developing-web-applications


1. auto-configuration

Spring Boot provides auto-configuration for Spring MVC that works well with most applications.

Spring Boot自動配置好了SpringMVC

The auto-configuration adds the following features on top of Spring’s defaults:

他的自動配置包含了以下Spring的初始特色

  • Inclusion of ContentNegotiatingViewResolver and BeanNameViewResolver beans.

ContentNegotiatinViewResolver:用來組合所有視圖解析器的

他自動配置了ViewResolver(視圖解析器:根據方法來取得試圖對象(View), 由視圖對象決定可轉載或著重定向)

制定方式: 

在main application下面定義回傳ViewResolver的方法

回傳一個私有的繼承ViewResolver的類別

@Bean
public ViewResolver myViewResolver(){
return new MyViewResolver();
}

private class MyViewResolver implements ViewResolver {
@Override
public View resolveViewName(String viewName, Locale locale) throws Exception {
return null;
}
}

我們如何知道這個會work呢?

主要是使用debug模式觀察DispatcherServlet中的doDispatch方法(用control+n找)

將中斷點下在這裡

當我們啟動之後, 訪問一個頁面, 我們就會看到

在this中他有multipartResolver文件上傳的, localeResolver國際化功能的Resolver

而我們要看的是viewResolvers中有我們的MyViewResolver的確進來了

也就是只要通過添加組件(Bean)就能夠使用


  • Support for serving static resources, including support for WebJars (see below).靜態資源文件夾路徑 webjars

  • Static index.html support. 靜態首頁訪問

  • Custom Favicon support (see below).favicon.ico

  • Automatic registration of ConverterGenericConverterFormatter beans.

    • 自動註冊ConverterGenericConverterFormatter
    • Converter:轉換器;public String hello(User user);類別轉換使用
    • Formatter:格式化器;2017-12-17===Date;
  • 自己添加的格式化器转换器,我们只需要放在容器中即可;

  • Support for HttpMessageConverters (see below).

    • HttpMessageConverters:SpringMVC用來轉換Http請求和響應的;User---json;

    • HttpMessageConverters:是從容器中確定的;獲取所有的HttpMessageConverters;

      ​ 自己给容器中添加HttpMessageConverter,只需要將自己的组件注册到容器中(@Bean,@Component)

  • Automatic registration of MessageCodesResolver (see below).

    • 定義錯誤代碼產生規則
  • Automatic use of a ConfigurableWebBindingInitializer bean (see below).

    • 我們可以配置一个ConfigurableWebBindingInitializer來替換默認的;(添加到容器)

---------------------------

2. 擴展SpringMVC

If you want to keep Spring Boot MVC features, and you just want to add additional MVC configuration (interceptors, formatters, view controllers etc.) you can add your own @Configuration class of type WebMvcConfigurerAdapter, but without @EnableWebMvc. If you wish to provide custom instances of RequestMappingHandlerMappingRequestMappingHandlerAdapter or ExceptionHandlerExceptionResolver you can declare a WebMvcRegistrationsAdapter instance providing such components.

If you want to take complete control of Spring MVC, you can add your own @Configuration annotated with @EnableWebMvc.

-------------------------

這段的意思就是~如果有些Spring MVC的功能不在初始設定中

但是你想要使用的話, 你可以新增一個類別符合他的設定, 他就會掃得到裡面的設定

那要注意的是, 如果加上@EnableWebMvc的話

對於SpringMVC的配置, 你就要自己全部重配了

連初始會去掃靜態頁面的功能, 也會需要自己手動建立導頁

------------------------

比方說以下我們想使用Spring轉頁功能, 將hello頁面轉到success頁面

 <mvc:view-controller path="/hello" view-name="success"/>
    <mvc:interceptors>
        <mvc:interceptor>
            <mvc:mapping path="/hello"/>
            <bean></bean>
        </mvc:interceptor>
    </mvc:interceptors>

以上在SpringMVC中的設置

我們在SpringBoot中可以用以下方式完成

先建立config.MymvcConfig類別, 去繼承WebMvcConfigurerAdapter類別

其中的addViewController方法就能完成我們要做的事(可用control+o查看所有方法)


//使用WebMvcConfigurerAdapter 可以來擴展SpringMVC的功能
@Configuration
public class MyMvcConfig extends WebMvcConfigurerAdapter {
//control+O 可以找到父類所有可用方法

@Override
public void addViewControllers(ViewControllerRegistry registry) {
//super.addViewControllers(registry);
//瀏覽器發送/atguigu請求來到success
registry.addViewController("/atguigu").setViewName("success");
}
}

-----------------------------------

原理:

​ 1)、WebMvcAutoConfiguration是SpringMVC的自動配置類

​ 2)、在做其他配置時會導入:@Import(EnableWebMvcConfiguration.class)

	@Configuration
	public static class EnableWebMvcConfiguration extends DelegatingWebMvcConfiguration {
		private final WebMvcConfigurerComposite configurers = new WebMvcConfigurerComposite();

	// 從容器中獲取所有WebMvcConfigurer
	@Autowired(required = false)
	public void setConfigurers(List<WebMvcConfigurer> configurers) {
		if (!CollectionUtils.isEmpty(configurers)) {
			this.configurers.addWebMvcConfigurers(configurers);
			// 一個參考實現:將所有的WebMvcConfigurer相關配置都來一起調用;
              //  @Override
              //  public void addViewControllers(ViewControllerRegistry registry) {
              //      for (WebMvcConfigurer delegate : this.delegates) {
              //          delegate.addViewControllers(registry);
              //      }
              /  }
		}
	}

​ 3)、容器中所有的WebMvcConfigurer都會一起起作用;

​ 4)、我們的配置類也會被調用;

​ 效果:SpringMVC的自動配置和我們的擴展配置都會起作用。


參考 https://github.com/sheep-cloud/Spring-Boot

2021年1月12日 星期二

[SpringBoot 1.5] 引入webjars和靜態頁面

 1 /webjars/**, 都去classpath:/Meta-INF/resources/webjars/找資源

webjars:以jar包的方式引入靜態資源

可以到網站 https://www.webjars.org/ 找尋需要用到的jar包

比方說我們找到Jquery3.3.1版本的Maven設置

<dependency>
    <groupId>org.webjars</groupId>
    <artifactId>jquery</artifactId>
    <version>3.3.1</version>
</dependency>

然後我們將其貼到SpingBoot專案的pom.xml當中

重新download jar檔案

我們啟動服務後, 就可以在 

http://localhost:8080/webjars/jquery/3.3.1/jquery.js

找到完整的檔案

2 靜態資源可以被找到的路徑如下

"classpath:/META-INF/resources/",
"classpath:/resources/",
"classpath:/static/",
"classpath:/public/"
"/":當前項目的根路徑

3歡迎頁面

也就是index.html頁面

在所有靜態資源下的index.html頁面都會被找到

當你有此頁面的時候

只要輸入 http://localhost:8080/

他會自動導入到首頁


2021年1月11日 星期一

[SpringBoot 1.5] SLF4j使用

查詢slf4j可以找到以下連結

http://www.slf4j.org/

點進去以後再點選SLF4J user manual

其中他就有把範例列出來

import org.slf4j.Logger;
import org.slf4j.LoggerFactory;

public class HelloWorld {
 
public static void main(String[] args) {
   
Logger logger = LoggerFactory.getLogger(HelloWorld.class);
    logger
.info("Hello World");
 
}
}


這一張圖的意思就是,SLF4J API 是中間抽象層

如果要將日誌印出來, 實現層有不同的做法, 都是屬於藍色的部分

而由於有些日誌項目推出較早, 不是基於SLF4J實現的, 因此需要中間的adaption layer

來做中間的轉換, 各實現層也有不同的jar包要導入

然而~你想使用slf4j+logback你可能會遇到Spring是用commons-loggin而

hibernate是用jboss-logging的問題, 其他框架, 也有可能是用不同的紀錄log模式

就會需要做替換的動作, 可以參考首頁中點入legacy APIs.


這裡所做的就是替換的意思

將commons logging API 替換成jcl-over-slf4j.jar

將log4j API 替換成log4j-over-slf4j.jar

因此如何將系統中所有的日誌統一到slf4j

1 將系統中其他日誌框架先排除出去

2 用中間包來替換原有的日誌框架

3 我們導入sl4j其他的實現

----------------------------------------------------------

而Spring Boot也是這樣替換的

這部分我們可以看到pom.xml檔案

點Diagrams->Show Dependencies

其中

<dependency>
<groupId>org.springframework.boot</groupId>
<artifactId>spring-boot-starter-logging</artifactId>
<version>2.4.1</version>
<scope>compile</scope>
</dependency>
他底層依賴關係如下


這部分沒觀察出來怎麼替換的, 

就我的觀察看起來蠻像jul-to-slf4j他使用maven的dependencies對到SLF4J

有引進slf4j的依賴

講者是說由其他的配置轉成slf4j然後用logback的方式進行實現


-------------------------

import org.junit.jupiter.api.Test;
import org.slf4j.Logger;
import org.slf4j.LoggerFactory;
import org.springframework.boot.test.context.SpringBootTest;

@SpringBootTest
public class SpringBoot03LoggingApplicationTests {
Logger logger =LoggerFactory.getLogger(getClass());
@Test
void contextLoads() {
logger.trace("trace日誌");
logger.debug("debug日誌");
logger.info("info日誌");
logger.warn("warn日誌");
logger.error("error日誌");
}

}
優先順序從低到高, 是從trace到error
預設只會顯示info 以上的log, 除非有設logging.level
--------------------------
appication.properties檔案
這樣寫檔會寫在C巢下面, 記得filename要重複path頭
logging.level.com.atguigu=trace
logging.file.path=/spring/logger
logging.file.name=/spring/logger/app.log

而 如果要使用 logback-spring.xml 可以參考

基本款

<?xml version="1.0" encoding="UTF-8"?>
<configuration scan="true" scanPeriod="60 seconds" debug="false">
<property name="APP_NAME" value="ApplicationName"/>
<property name="LOG_FILE_PATH" value="/LogFile/${APP_NAME}/logs/"/>
<!--設置 Log 輸出格式-->
<property name="PATTERN_FORMAT" value="%d{yyyy-MM-dd HH:mm:ss.SSS} %-5level %class{36} %L %M - %msg%xEx%n"/>
<contextName>logback</contextName>
<!--輸出到 Console-->
<appender name="console" class="ch.qos.logback.core.ConsoleAppender">
<encoder>
<pattern>${PATTERN_FORMAT}</pattern>
</encoder>
</appender>

<!--輸出到檔案-->
<appender name="info" class="ch.qos.logback.core.rolling.RollingFileAppender">
<rollingPolicy class="ch.qos.logback.core.rolling.TimeBasedRollingPolicy">
<fileNamePattern>${LOG_FILE_PATH}/%d{yyyy-MM-dd,aux}/logback.info.%d{yyyy-MM-dd}.log</fileNamePattern>
</rollingPolicy>
<encoder>
<pattern>%d{HH:mm:ss.SSS} %contextName [%thread] %-5level %logger{36} - %msg%n</pattern>
</encoder>
</appender>


<root level="info">
<appender-ref ref="console" />
<appender-ref ref="info" />
</root>

</configuration>

如果想將不同級別的檔案拆開來存放可以使用

filter 放在appender中就可以

<filter class="ch.qos.logback.classic.filter.LevelFilter">
<level>info</level>
<onMatch>ACCEPT</onMatch>
<onMismatch>DENY</onMismatch>
</filter>
範例如下
<?xml version="1.0" encoding="UTF-8"?>
<configuration scan="true" scanPeriod="60 seconds" debug="false">
<property name="APP_NAME" value="ApplicationName"/>
<property name="LOG_FILE_PATH" value="/LogFile/${APP_NAME}/logs/"/>
<!--設定 Log 輸出格式-->
<property name="PATTERN_FORMAT" value="%d{yyyy-MM-dd HH:mm:ss.SSS} %-5level %class{36} %L %M - %msg%xEx%n"/>
<contextName>logback</contextName>
<!--輸出到 Console-->
<appender name="console" class="ch.qos.logback.core.ConsoleAppender">
<encoder>
<pattern>${PATTERN_FORMAT}</pattern>
</encoder>
</appender>

<!-- info level 輸出到檔案-->
<appender name="info" class="ch.qos.logback.core.rolling.RollingFileAppender">
<rollingPolicy class="ch.qos.logback.core.rolling.TimeBasedRollingPolicy">
<fileNamePattern>${LOG_FILE_PATH}/%d{yyyy-MM-dd,aux}/logback.info.%d{yyyy-MM-dd}.log</fileNamePattern>
</rollingPolicy>
<encoder>
<pattern>%d{HH:mm:ss.SSS} %contextName [%thread] %-5level %logger{36} - %msg%n</pattern>
</encoder>
<filter class="ch.qos.logback.classic.filter.LevelFilter">
<level>info</level>
<onMatch>ACCEPT</onMatch>
<onMismatch>DENY</onMismatch>
</filter>
</appender>

<!-- warn level 輸出到檔案-->
<appender name="warn" class="ch.qos.logback.core.rolling.RollingFileAppender">
<rollingPolicy class="ch.qos.logback.core.rolling.TimeBasedRollingPolicy">
<fileNamePattern>${LOG_FILE_PATH}/%d{yyyy-MM-dd,aux}/logback.warn.%d{yyyy-MM-dd}.log</fileNamePattern>
</rollingPolicy>
<encoder>
<pattern>%d{HH:mm:ss.SSS} %contextName [%thread] %-5level %logger{36} - %msg%n</pattern>
</encoder>
<filter class="ch.qos.logback.classic.filter.LevelFilter">
<level>warn</level>
<onMatch>ACCEPT</onMatch>
<onMismatch>DENY</onMismatch>
</filter>
</appender>

<!-- error level 輸出到檔案-->
<appender name="error" class="ch.qos.logback.core.rolling.RollingFileAppender">
<rollingPolicy class="ch.qos.logback.core.rolling.TimeBasedRollingPolicy">
<fileNamePattern>${LOG_FILE_PATH}/%d{yyyy-MM-dd,aux}/logback.error.%d{yyyy-MM-dd}.log</fileNamePattern>
</rollingPolicy>
<encoder>
<pattern>%d{HH:mm:ss.SSS} %contextName [%thread] %-5level %logger{36} - %msg%n</pattern>
</encoder>
<filter class="ch.qos.logback.classic.filter.LevelFilter">
<level>error</level>
<onMatch>ACCEPT</onMatch>
<onMismatch>DENY</onMismatch>
</filter>
</appender>

<root level="info">
<appender-ref ref="console" />
<appender-ref ref="info" />
<appender-ref ref="warn" />
<appender-ref ref="error" />
</root>

</configuration>
參考來源
邦哥不會寫程式

量身訂做建議(37 歲,6 年 Java 後端工程師)from chatgpt

🎯 量身訂做建議(37 歲,6 年 Java 後端工程師) 1️⃣ 先看你的條件 年齡 37 屬於「中高年資」工程師,履歷上的 深度 / 系統設計能力 會比「語言多寡」更重要。 6 年 Java 後端 代表你在 Spring Boot、資料庫、API 設計...